Sunday, September 28, 2014

Fall Decor by Bloggers


After our soccer game on Saturday, I pulled out my two bins of Fall decor to get started making this home feel more like the cozy Autumn days we're starting to have.  I didn't get too far in decorating, but managed to change up a few pillows in the living room.  The ideas are still brewing. . . .  Then, on Sunday, I joined Better Homes and Gardens Pinterest board "Everything Fall" and wanted to share a few of my very favorite Fall Decor pins with you.  Sometimes I get stuck in my small blog world, but seeing all these homes with gorgeous Fall decorations makes me want to share with everyone how much talent and goodness are still in blogs!  #iheartblogs Please visit the original source, which I've linked to.  You may find some new blogs to fall in love with!


Emily A. Clark's fall front porch.  Emily is so good at "design simplified."  It's her tagline after all! 


Craftberry Bush made the coolest feather wreath out of book pages.  And the cloche styling is fantastic- love the beautifully layered neutral tones.  


Bliss at Home adds warm gold metallics to her fall decor- a woman after my own heart.  


Dwellings by Devore sets a gorgeous fall table with a cool piece of driftwood and inexpensive flowers in mason jars.


Just A Girl turned her kitchen sink into a happy Fall place to do dishes.


At Home with The Barkers shows that less is more with their Fall mantel. 


The Wood Grain Cottage's welcome sign blows me away.  There's a tutorial on the blog.


The Golden Sycamore embroidered this pillow and shows you how.  


Perfectly Imperfect.  Just wow. 


Sand and Sisal made this perfectly rustic Fall wreath and shares the step-by-step process.


_____________


On Honey We're Healthy:  One Week of Group Exercise Classes Recap 


Friday, September 26, 2014

Weekend Steals & Deals


I'm so happy I made it through this week! It's been one of those crazy busy weeks and I need a break!   Like many of you, everyday this week was jam packed, but it feels good to have made it to Friday. Today, we get to start relaxing and I'm looking forward to a nice lunch with friends and a playground playdate after school.


On the blog, it's a cozy good edition of this Weekend's Steals & Deals.  I love this time of year- the weather's getting cooler, the school routine has kicked in and we're back on schedule, and at the stores, prices are getting lower and lower.  I'm seeing so many Fall fashion items that have been reduced more than once, which makes this a perfect time to stock up on those things you've been eyeing.  


Bobeau Asymmetrical Fleece Wrap Cardigan $39.90, $58

I'm cRaZy over this asymmetrical cardigan- I can't believe I didn't see it sooner!  It has over 1,000 rave review- that it nuts! But, I can see why people love it- comes in a bunch of colors and you can wear it with leggings, jeans, pants and you're instant cozy chic. 


Olivia Moon Ruched Sleeve Jacket (Regular & Petite) ($79.50 $47.40) 5 colors


I'm so excited to see this jacket I posted about a few weeks ago go on sale for 40% off! And they still have every size in the Regular version. 


This jean jacket isn't on sale, but it's a great price for such a stylish one- dig the cut and color on this one. 


Gibson Textured Jersey Sweatshirt $23.40, $39 (4 colors)


This is the kind of shirt I live in for casual days.  


Or one like this!


MODlusive Ruched Sleeve Cardigan $25.20, $42 (4 colors)


I'm big on cardigans over here.  This one is such a great price with close to 400 reviewers loving it. 


Halogen Stripe Block Merino Wool Three-Pocket (regular & petite) $46.80, $78


LOFT Camp Pants (was $59.90, now $44.99 + 40% off) (petite, regular, tall) also in tan, white


LOVE these kind of pants for running around in. 


I kinda gasped when I saw this blouse, there's only limited sizes left, so if you're a large or XL, snatch this up!


NYDJ Sleeveless Henley Blouse $47.40, $79 (also in blue and white)


Shirtdresses were my favorite for work- two fun prints here. 


Maggie London is a quality brand I love, especially in dresses. 


Everyone needs a great pair of well-make leggings in their wardrobe.  This corduroy pair with faux pockets looks super comfy. 


Oohing and ahhing over this skirt!  Would be so cute with booties too. 


Jessica Simpson Arriel Bootie $76.96- 20% off (also in red, black)


Vince Camuto Fenette Peep Toe Bootie $69.47- 50% off (also in black and pebble grey)


Steve Madden Yale Belted Boot $127.46- 25% off (also in black)


Nine West Bridgider $89.90- 35% of (also in tan, red)


Franco Sarto Linden Bootie- $99.90- 33% off (also in tan)


Vince Camuto Kasi Pointy Toe Bootie $89.37 - 40% off (also in red, black)


Speaking of booties, the prices are going down! 


 Micahel Kors Cooper Watch $167.49, $250


I'm still a fan of a chunky gold watch and this one is awesome!  I almost never see them on sale, so this is a great price at 33% off.


My favorite fall scarf right now. 


GAP also has a great selection of scarves from $11 - $20.


weekend steals & deals 


ANN TAYLOR:  50% off select Full-Price and Sale styles. No code needed.  FREE shipping on $175 or more & $8.95 flat rate shipping. Ends 9/29.


ANN TAYLOR LOFT:  Flash sale until 10am Friday ($50 off $100 spent and $60 off $100 spent with your LoveLoft card.  Use code FLASH


BANANA REPUBLIC:  $25 off every $100 you spend. Use code BRHERENOW  FREE shipping and FREE returns on orders over $50.  Ends 9/30.


EXPRESS:  Semi-Annual Clearance Sale, up to 60% off. 


GAP:    Extra 25% off your purchase.  Use code EXTRA Ends 9/29.  FREE shipping and FREE returns on orders over $50.


J CREW:  Extra 30% off final sale styles.  Extra 40% off with your J.Crew card.  Use code PICKASALE $5 flat-rate shipping and FREE shipping on orders of $150+


NORDSTROM:  Clearance Sale! Always FREE shipping & FREE returns.


ZAPPOS:  Order before 1PM PST for FREE next business day shipping on all Clothing. 


have a great weekend!


affiliate links used


Thursday, September 25, 2014

Snakeskin Kleenex Box from Duct Tape


I'm busting out the duct tape again and turning an ordinary wooden kleenex box into something fancy!  I originally purchased this duct tape (Duck Tape brand) at Target forever ago and turned a shoebox lid into a cool tray.  But, for this project, I ran out mid-way through and then couldn't find it anywhere.  I looked at two Targets, a Michael's, and two Hobby Lobby's.  I eventually had to order more from Amazon.  


As you would imagine, creating this faux snakeskin kleenex box was as simple as wrapping the tape around the box (I started with the top, then the sides).  The pattern on the tape is forgiving, but you can try to line the pieces up.  I painted the very bottom black with craft paint so that I could use just three strips of tape along the sides and so the bottom wasn't taped close- you have to slide it open to insert the kleenex box.  For the hole in the top, I made a straight cut in the tape, then folded the tape underneath the lid part. 


I think I must be getting allergies as I get older, because it seems I'm reaching for a kleenex several times a day.  I keep boxes everywhere.  It's nice to have a stylish box on my bedside table.  Especially next to that Homegoods lamp! Score! 


_______________


If you missed yesterday's post, I wanted to let you know that I'm at Pinterest Told Me To, sharing my "Closet Confessions".  The Internet ate half my post yesterday morning and I had to fix it, so I wasn't sure if you saw that part.  ;) 


See you tomorrow with this Weekend's Steals & Deals! 


Wednesday, September 24, 2014

Wardrobe Wednesday - Welcome Fall Scarves


Raise your hand if you're ready to start dressing for Fall!  I've got that "raise your hand" thing on my mind since it's what my 4-year old has been instructing me lately- guess he's hearing that in school a lot. "Mom, raise your hand quietly if you want to play with my cars." ha! But, really, I'm ready!  Maybe you live in the cooler parts of the world and have already been busting out your fall attire.  Today I'm thinking of that one inexpensive accessory that transitions your wardrobe from Spring to Fall instantly- a scarf.  I'm crazy for the one below!  This is the kind of Fall scarf you could also use in your fall decor- drape it over a table, hang it off your sofa, or casually tuck it into a woven basket.  


First up is my favorite traditional fall outfit.  How cozy does that scarf look?  The colors, pattern and fabric are so fall.  And the cool thing about a scarf like this is that you can play up any of the colors in it.  I made the blue more of a focus here with the blue jeans and bag and kept the warmth with brown boots.  And I'm a big fan of a boatneck tee- dig this one that has a longer length too.  I want it in every color.  


Pink and grey can be fall colors too- especially with some suede booties (love)!  It's a softer look for sure, but cozy nonetheless.  A blushy-pink seems to be a universally flattering color to wear near your face too. 


scarf | vest | jeans | booties | bracelet 1 2 3 | watch | purse 


I really need this colorful infinity scarf in my life- it looks so warm too.  I don't know how I overlooked my Franco Sarto booties in black, but I think they look great with this look- dig the brown heel with them.  As I showed last Friday, that perforated detail is popular now and is so cool on this bag.  Last winter, I was wearing my puffy vests all the time, so I included this one for you- comes in other colors too!


So tell me, are you getting to wear your Fall clothes now or is it still to warm?


And, I've love you to stop by Sheaffer's blog to see my Closet Confessions!  This is the woman who showed me it's okay to wear black and brown (and grey) together! ;)  She's always got the inside scoop on steals and deals too, so you may want to become a regular reader- if you're not already!  Or if you just want to laugh really (really) hard- this girl is funny- have you read her Bachelor recaps?!  Her commentary on my 'closet confessions'  post had me cracking up! Out loud!


affiliate links used

Sunday, September 21, 2014

10 Steps to Better Blog Posts


After over 4 years of blogging an average of 4 days a week (and a second blog to boot!), I've gotten into a groove with the process I go through when writing a blog post.  My method and hours have changed from the days when I blogged late-night after work from my couch, and now I blog pretty much exclusively from my bright home office while my son is in preschool.  I outlined my blogging process for you below and it breaks down to 10 steps that I generally follow every time I sit down to write a blog post.  This post is geared mainly towards my fellow "home" or "DIY" bloggers, but bloggers in other niches can certainly benefit from this process.


1. generate ideas 


As a blogger, having an ongoing list of blog topics and ideas is critical for keeping your blog going.  Readers like consistent content and want to see fresh ideas being shared regularly.  Keeping a "Master List" has been helpful for making me feel like my ideas are contained in one place and helping me "remember" ideas I'd otherwise forget. I tend to jot things down in several places and then add them to my Master List later.  I also use the "Notes" function on my iPhone for jotting down blog ideas on the go.  


Since I'm mainly a "home blogger" most of my blog ideas are generated right from my house.  I have an idea of things I want to do to improve the look or function of our house and that provides a lot of the content for my blog.  You can go from room to room in your home to brainstorm ideas for things you'd like to improve/decorate/organize.  Remember, this is just a "dream list" of ideas to help get you going, you don't have to execute them all immediately or ever. 


I'm constantly tearing out pages from magazines, browsing Pinterest, Instagram, blogs, and home sites to see what's new or catches my eye.  I often take screen shots with my phone to save an image for a future writing point.  


People love to see seasonal content as well, so if you have holiday ideas, those make great blog posts.


2.  select a project/gather supplies/shop 


From your list of ideas, you need to choose which one you will execute for your next blog post.    This often depends on time, effort, money, energy.  Many times, as a home or DIY blogger, you'll have multiple projects going at once in various stages of completion.   


Once you choose the next post idea, you need to figure out if you have all the supplies necessary to complete the post project.  For instance, let's say I decide to do a "Fall Mantel", I'd start with an idea for how I want the mantel to look and feel- thinking about the colors, patterns, and the mood I want to convey.  Then, I'll shop my home to pull the look together.  But, if I wanted to add a DIY wreath to the mix, I may need to shop for additional elements to create the look.  


If I need to purchase supplies for a post, I create a specific list of what I need (per project or post),  and I only shop once a week (or via Amazon) to save time.  Sometimes, you can get product from retailers/vendors by asking them for it in exchange for mentioning it on your blog and promoting it via social media.  This requires advance planning though, because they might not respond to you immediately or it takes several weeks for you to get the product.  


3. create 


Creating the project, decorating a space or scene of the blog post is the fun part!  Play, have fun and use your creative juices to pull something together that you're excited to share.  Add your personality and specific touch to the project to make it "yours."  And always leave your readers with something they can "take away" from your post; be it a tip, resource, a new way of seeing something, or just a good feeling.


4. photograph


If you are doing a DIY project, it's probably important to photograph the process the whole way through to give your readers a visual of how to imitate your efforts.  Much has been written about how to achieve the best photos possible, and I'm self-taught using all free tutorials I've found online and through playing with my camera and practicing a lot.  I use a Nikon D90- our Christmas family gift in 2010.  For a year, nearly all of my photos taken with that camera were terrible.  But, as I learned, my photography improved.


Try taking photos from different angles and shoot one subject for a significant amount of time, taking lots of pictures, adjusting your camera settings as needed.  Sometimes you get the best shot right away, but most of the time, it’s those last few that are really great.  I tend to get into a photographing groove after I’ve been at it for about 20 minutes.  Think about leaving “empty” space if you want to add graphics to your that don’t interfere with the picture.  Also, take photos that you don’t intend to post on your blog, just for practice and fun.  


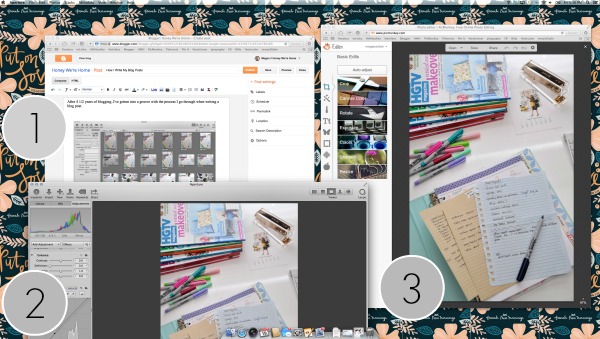
5. select the best photos  


I have a Mac and store my photos in Aperature (the Mac equivalent of Photoshop).  After I'm done photographing and uploading my photos to Aperture (via my wireless Eye-fi card), I view each one and write down the photo numbers of the best ones, then narrow down to the best few to share on my blog.  How many photos you include in your posts is up to you, but I try not to include a million shots of the same thing.  Just enough to tell the story from different angles perhaps.


6. edit photos 


I begin editing my photos in Aperture, typically using curves to adjust the light and dark aspects of the picture, then adjust white balance and sharpen, if necessary.  I then use PicMonkey to resize (600px) and add my watermark.


You can see the difference in the two photos below: 


                SOOC (straight out of the camera)                                    After editing                                                              


I've got three windows open on my computer during this process: 1) Blogger - I drop the editing photos into the post after they are complete; 2) Aperture for choosing, editing and viewing the photos; and 3) PicMonkey for applying the final edits. 


7. draft the content 


Usually, I insert all the photos into the post in the order that best tells the story, then write the content around the photos.  I can then see where the "holes" are and may need to add more photos.  Regardless of whether you write the text or add the photos first, it's important to be authentic on your blog.  If a reader met you in person, the best compliment you could receive is, "you are just like I thought you'd be from reading your blog."  


8. create a pinnable graphic 


This step isn't mandatory, and I often don't include this step because I prefer to let the photo do the talking.  But, sometimes, a good graphic will help spread your post throughout Pinterest, generating more visits to your blog.   This "2014 Printable Calendars" collage graphic I made and published in January has been one of my most visited posts this year.  


I use PicMonkey to create graphics and made a few different options to show you what you could do with a single photos on a post like this:


As you can see, I used the same photo in the five graphic images, just changed the overlays, fonts, and text and the feel/message of the graphic is different with each one.  For more tutorials using PicMonkey, you can read my previous posts here, here and here.   Like photography, it's fun to play with graphic design elements too. 


9. final edit 


After you've written the entire post and are about to publish it, read through it again thoroughly for grammar, punctuation, spelling and flow.  If you're posting a tutorial, make sure it makes sense.  Anticipate the questions a reader may have and answer them for her/him in your post.


10.  respond to comments 


A good blogger not only reads their comments, but responds to them as well.  I've certainly been a "bad blogger" and I cringe when I look back at old posts where I've gotten several comments that I didn't respond to.  In my defense, most of my blogging was done while juggling a full-time job, baby and household, and I was doing good just to get the posts up.  But, the best blog posts often have additional commentary and conversations occurring in the comments.  If someone asks a question, it's likely other people have the same question, so it's important to answer in the comments section.  It's also just kind to acknowledge the people who took time out of their day to leave a comment- especially when most people read without commenting.  


There's a lot more detail I can cover under each point, so please let me know if you want more posts on the topic of blogging. 


___________________


I'm also "dropping in for coffee" at my friend Krystine's blog today.  I'd love you to stop by!