Thursday, January 30, 2014

Teacher Appreciation Gift


With a child now in preschool, and through the benefit of being a "room Mom" I see firsthand how hard our teachers work and how much they care for our kids.  Especially at this young age, they are as much teachers showing students how to read and write as they are caregivers helping kids navigate through emotions toward independence.  


Although National Teacher Appreciation Week is in May, our school is celebrating our teachers this week with a luncheon and small tokens of appreciation from the students.  I know teachers love gift cards and Stella & Dot (judging by the responses on my instagram about the teachers' Christmas gifts), but for this event, we're giving notepads and pens.  Maybe I'm biased because I'd love to receive this as a gift, but I think it makes a thoughtful present, especially when you wrap it up with a sweet handwritten sentiment. 


These notepads were found at Homegoods, but I've also seen similar ones at craft stores like Michael's and Hobby Lobby. 


I added decorative ribbon to each set and a little gift tag that I stamped "Thank You" and will write the "to" and "from" on.    These little details are nice!


We have two homeroom teachers and a Spanish teacher to give these gifts to, but I'm always thinking of how all the gifts add up when you have multiple kids with multiple teachers. These notepads were about $5 each. 


If you have posted about a great teacher gift, please leave a link in the comments.  I want to add more pins to my "TEACHER" Pinterest board.  You can follow all of my Pinterest boards HERE.


If you are a teacher, let us know what you like to receive as a token of appreciation. We gave our teacher a little "getting to know you" form to fill out at the beginning of the year so that we'd have an idea of what they like.  Do you teachers like that or just prefer gift cards?  Where do you like gift cards to? 


Tuesday, January 28, 2014

Stella & Dot Spring 2014 Collection


Never one to disappoint, Stella & Dot just launched their Spring  2014 line and it's super cute!  I added a few things to my growing collection.  


This necklace is really versatile in how you can wear it so many ways. 


It also comes in white.


The white necklace I purchased is the Mallorca Pendant Necklace. The chain is nice and chunky.  I picture wearing it casually with jeans and a tank, or dressing it up with heels and a jacket. 


And I know this cross-body bag will come in handy! I have one that I wear all the time (similar to this one, but without the chain-strap), but I like that this one is a bit bigger- about the size of an ipad.  Also, you can use it like a clutch by removing the long strap. 


The new arrivals are delightful!!


I've also got my eye on the items below:


I'm kind of in love with the Elodie Necklace too.


Their bags are fantastic.  I have two totes that I use as a gymbag /pool bag and in general as a large purse.  I gave my girlfriend one for her 40th birthday. 


Their poufs are awesome.  I use them as makeup bags and store pens/pencils/markers in them too.


Of course, Valentine's Day is just around the corner . . . 


Sardinia Pendant- wear it with or without the pendant.


I've been a Stella & Dot stylist for over a year, so if you purchase anything from the site through my link, I will earn a commission.  I'm hosting a trunk show at my house in February, should be really fun!


Monday, January 27, 2014

DIY Animal Jewelry Holder

After snazzing up the dresser in my closet, I had some fun creating a new way to display jewelry with plastic animals from the dollar store.  


It seems almost anything can be transformed with spray paint and a glue gun these days! 


I used one of our silver china plates and a decorative saucer dish that I found at Homegoods for the bases.  Then, I applied a dot of hot glue to the feet and attached them to the plates. 


Instant jewelry holder!  I think they would make a great Valentine's gift for a woman in your life too. 


The elephant's trunk and tusks would also make great ring hangers. 


Do you have a cute way you display your jewelry? 


Wednesday, January 22, 2014

Curved Stripes Under the Stairs


When I painted wide stripes in our entryway, I loved the result, but thought they looked a little bit out of place with just the one wall painted.  Continuing the stripes around the corner and under the staircase might have looked too busy, but I'm actually loving the result! It's awesome when you finish a project and are immediately pleased with the outcome.


I started by repainting the entire wall it's original color (for touch-ups and to start with a clean slate).  Having only painted the entry wall previously, my husband leveled, drew, and taped the lines for the two walls under the stairs.  Have to give credit where credit is due!


Unfortunately, we used yellow tape that is meant for freshly painted walls but it didn't stick well and started falling from the walls, so I had to retape almost the whole thing.  I used Frog Tape for the entryway walls and I think that worked the best.  I had to touch-up a few spots under the stairs, but that might have been because I had to stop and buy more paint mid-project or because I was more careful in pressing the tape down very well on the entryway wall. 


I wrote a detailed post about how to get perfect stripes when I painted the entryway wall, but the main tips are:


  • Use a leveler to draw your lines (not a laser leveler- it's too hard to draw on a line that keeps disappearing). You may need one person to hold the leveler and another person to draw the lines. 

  • Tape above and underneath the drawn lines. Press the tape down hard to get the best seal. 

  • Paint over the tape with the opposite paint color.

  • Paint the stripe color (2-3 coats).

  • Peel the tape off while the stripe paint is still wet. 


You can see the type of levelers I have in the picture below. And the tall ladder I had to use to get up so high.  Yikes! I removed the light switch plate when painting the walls and then used a roller to paint it so it would blend with the wall.  It doesn't look that great though- I probably should have tried to find a spray paint to match. 


The finished result looks so much better! See the before HERE


What do you think?  


_____________


The paint colors used are:


Door:  Sherwin Williams Brown Fox


Wall Color:  Sherwin Williams Accessible Beige


Dark Stripe:  Sherwin Williams Urbane Bronze


______________


*The winner of the Hustle print giveaway is 


Congratulations!


Monday, January 20, 2014

Dresser Makeover


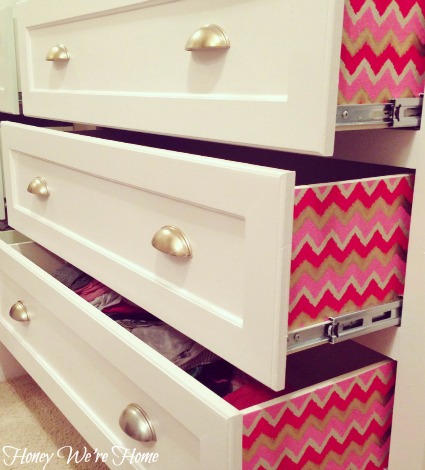
Happy Monday friends!  I spend a chunk of time last week organizing my closet and redoing the built-in dresser.  It was originally painted Sherwin Williams Divine White (flat) which resulted in lots of scuff marks that were impossible to clean, so I repainted it Sherwin Williams Venus Pink (high gloss).  The island and shoe shelves are also now that shade of pale pink.  I moved my handbags and travel totes to the shelves above the dresser so I can see them more easily (they were hidden behind the door before).  


To help the purses keep their shape, I have them stuffed with thick tissue or small pillows I'm not using.  I spray painted the silver drawer pulls gold and added decorative paper to the sides with adhesive spray.  


I rearranged the contents inside the drawers too.  I used to have jewelry in the top drawer and makeup on the dresser top, but I donated the pieces I never wore and moved the makeup into the first drawer, except for the brushes, that I like to keep upright in a cup. 


With the top of the dresser clear, I had room to style it up with accessories and girlie things. 


The nameplate bracelet is traditional Hawaiian jewelry that I got from my Grandma when I was young and she lived in Hawaii.  I still cherish it and wear it all the time. 


I adore this old photo of my parents from over 30 years ago (wow!), so I decided to tape it to the jewelry box where I could see it everyday. 


I still want to reorganize my hanging clothes and find hooks for a couple of large tote bags that didn't fit in dresser shelves.  A few more tweaks and the closet will be ready for Spring! :) 


Thursday, January 16, 2014

Lined Dresser Drawers


Happy Friday y'all!  Just popping in to give you a sneak peek of a project I've been working on this week.  I still have more photos to snap before I can share the finished result, but this little pop of pizzaz has been making me smile.


I used spray adhesive to attach the paper to the drawer.  It only took a couple minutes and adds an unexpected flair to an otherwise ordinary drawer.


Fun, huh?!


Have a great weekend!


Monday, January 13, 2014

Popular Pins // Financial Edition


Getting our home organized and our finances in order go hand-in-hand, especially at the new year.  I like to go on a "Spending Freeze" in January to catch my breath and keep money in the bank as opposed to flying out the door.  


If you follow me on Instagram, you saw I purchased 2 new rugs lately, but I used credit I had built up, so I'm counting that okay.  To help prevent me from buying anything else, I'm just "pinning" the things I want and will reevaluate next month or so regarding whether I will actually purchase them or not.  I'm also working on prioritizing the things I want/need so that I make better spending decisions.  I signed up for Amazon Prime on your advice and have been using the "subscribe and save" program for items like paper towels, cleaning supplies, goldfish, etc.  So far, so good!


I've collected popular pins that can help us get "financially fit" this year and shared a few of my favorite financial books. 


56 Things to Do Instead of Spending Money via And Then We Saved.  Anna paid off $24,000 in debt in 15 months and dedicates her blog to helping other people live debt free.


5 Ways to Get Your Budget Back on Track via Living Well Spending Less.  I love Ruth's blog too, she has a lot of good cleaning and organizing tips. 


Dave Ramsey is the King of debt-free living.  I followed his plan to pay off my credit card debt in college and haven't amassed any more since.  I even saw his conference when he came to town. I love listening to his radio show (check your local listings). I would get all teary-eyed hearing families scream, "We're debt free!!"


The Nester reveals how she and her husband paid off $150k in just 5 years.


52 Week Money Saving Challenge via A Helicopter Mom.  This chart is pretty cool, it shows you how to save nearly $1,400 a year  pretty painlessly by adding a dollar a week. 


Like I mentioned above, Dave Ramsey has been instrumental in helping me learn how to manage my money and instilling the importance of living debt-free.  I never read his books, feeling that I got so much out of his show instead, but I know people swear by "The Total Money Makeover."


I'm also a huge fan of Suze Orman (although their philosophies differ somewhat).  Her big mantra is, "People first, then money, then things."  I read "The Courage to Be Rich" in my 20's and still recommend it, although she's written several good books since then. 


David Bach wrote one of my favorite financial books, "Smart Women Finish Rich" and he also authored, "Smart Couples Finish Rich."


I hope these resources help!  Do you have any to share?